Exquisite Croissants Recipe
Rediscover a superior quality pastry.
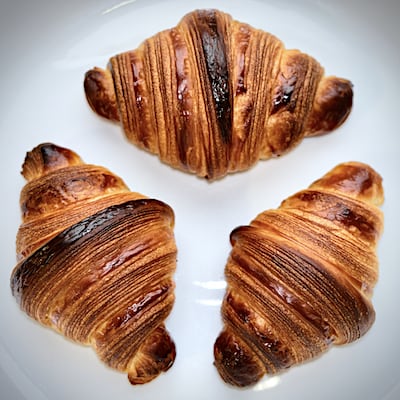
Croissants
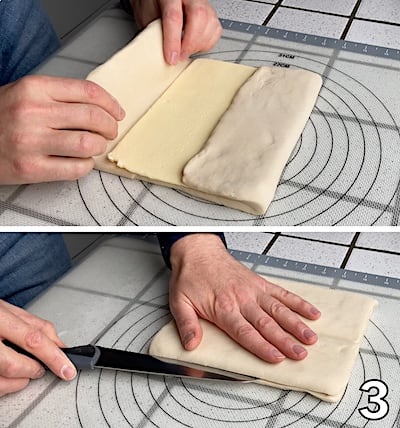
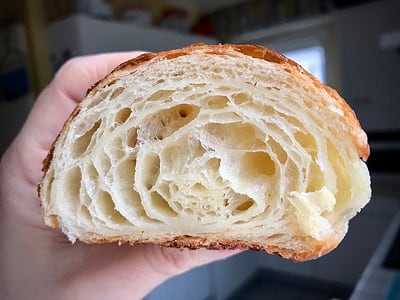
You thought you knew this traditional pastry? Rediscover this great classic as if it were the first time. This croissant offers a rich but airy texture, a distinct taste of fermented dough, butter and hazelnut, a crispy base and a generous consistency. This exquisite recipe gives a lot of taste as well as a fleshy substance in the mouth as opposed to the very airy and void-filled puff pastry, with a discreet taste and therefore no pleasure.
I developed this personal recipe with a lot of diligence and multiple tests until I was completely satisfied. The croissants are prepared in 36 hours with slow fermentation. The recipe doesn't matter since it depends on taste. What matters is to follow the manufacturing process.
The croissants are excellent and of superior quality, rich in flavour with an ideal texture and crumb. Everything is detailed so that you get them right on the first try.
Ingredients for 6 croissants:
- 260 g of organic white bread flour (T65) (more taste) if possible with 11 to 12% protein (more regular puffing, better and richer texture and better fermentation),
- 35 g blond cane caster sugar (or other less refined sugar: brown sugar, muscovado…),
- 25 g quality butter with taste (add 10 g for a deeper taste),
- 7 g fine salt,
- 10 to 12 g fresh yeast or 4 to 5 g dry yeast (see quantity required for 260 g of flour),
- 80 g (or 130 g) cold spring or filtered water without the chlorine from tap water which destroys the yeast (if the air is dry with a humidity level of less than 60 % and after 2 minutes of mixing there is still dry flour, add 2 to 3 g of water to the mixture; add less with a more refined cake flour [T45 or T55]),
- 50 g cold milk, if no milk then take 130 g of water. The milk will soften the taste of fermentation,
- 7 g liquid honey (if necessary, warm it up to make it more liquid), prevents the dough from drying out.
- If the flour lacks protein or if it is not strong enough, to give a more airy crumb: 25 g egg whites and remove 20 g of water. Pour this egg white into the cold water for the dough, the rest of the egg will be used for egg wash.
- 125 g butter for lamination; choose it with 60% saturated fatty acid, hard to the touch when cold at 5°. At 12°, it is plastic when spread out, stretches and stays smooth, does not break, flatten it with a roller to soften it.
- Glazing: mix an egg with a pinch of salt (0.5 g) and 15 ml of whole milk, wait 5 minutes before applying. Or just take some milk. To give a sweet touch, make a light icing, mix 10 g of sugar with 5 g of water, heat to 50°, immediately after removing from the oven, spread with a very light and superficial brush on the hot croissants and immediately put back in the hot oven at 180° for 2 to 3 minutes.
Professionals make croissants with constant quality. They have tools and materials that balance out and correct the hazards and variations (flour for pastries, various additives, butter for lamination, rolling mills, leavening closet…). Sometimes the croissant has lost its taste and texture. To rediscover this, this excellent recipe can be made in 2 days or in 36 hours, due to the long periods of rest. Several batches will be needed to master all the techniques without the professional's tools and products. Select the right ingredients whose characteristics are specified in the list and, above all, don't change them! With each change, the result will be different and it will take several tries to adapt the technique.
Challenges are in the temperatures control and making a plastic dough for lamination (it stretches and keeps its shape) but not an elastic one (it stretches and shrinks).
As a private individual, you only have access to some products on the market that do not have the same qualities as those of professional bakers. After many tryouts, I have gained the best results in taste and texture with the following products:
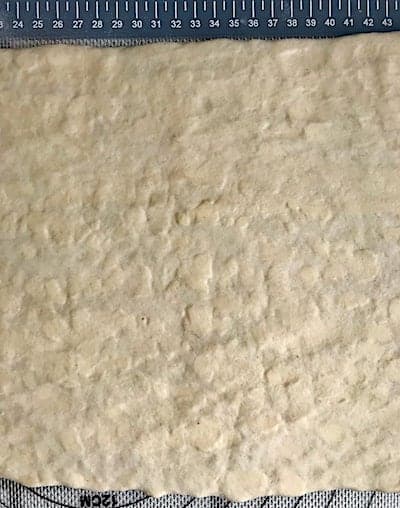
- Organic white bread wheat flour (T65 in France) with a protein rate of between 11 and 12 g per 100 g. I was satisfied with distributors' brands, but beware, these are trading flours with various origins whose qualities for bakery products are not guaranteed over time; one batch may be good and another batch may be unsuitable, also, the label on nutritional facts is not always revised and updated accordingly (see the photo below showing a very contrasting result with two different batches of flour from the same distributor). The protein content of around 12% is the essential element. Bread flour (T65) provides more “baker's” taste than cake flours (T55 or T45) with an equivalent texture,
- Butters for lamination or puff pastry: the real secret of butter for lamination is the maximum amount of saturated fatty acid (around 60%) which will melt less quickly at high temperatures and it will detach the layers more easily during cooking; the butter should also be flattened with a roller to soften it,
- Butter for the dough: when the butter for lamination is tasteless, incorporate into the dough a good European style butter, but unsuitable for puff pastry (with less saturated fatty acid), to add more flavour to the croissant; prefer the one with a good butter taste, you will be disappointed to find that today, the majority has a bland taste (I have tested about twenty butters, even the farmer's butter with cows grazing on flowery meadows and its old-fashioned churned cream can have a disappointing taste), know-how is as important as the quality of the raw material,
- Dry yeast; many people will tell you to prefer fresh yeast provided you bake the croissants afterwards or refrigerate the raw dough for the next morning, but freezing quickly degrades the activity of the fresh yeast. If you freeze the raw dough, use dry yeast. Its disadvantage is that it takes longer to hydrate and activate. Prefer dry yeast if you freeze croissants before baking (freezing will not kill the yeast that is still dry and inactive in the dough).
Course of the recipe:
Dough:
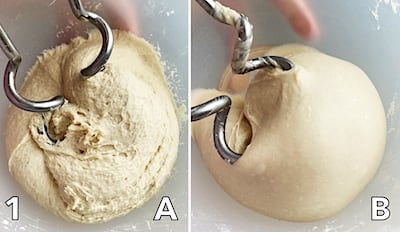
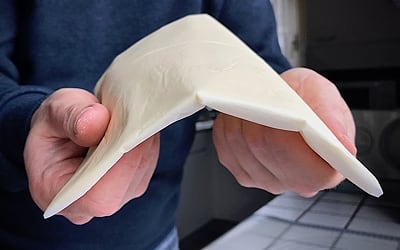
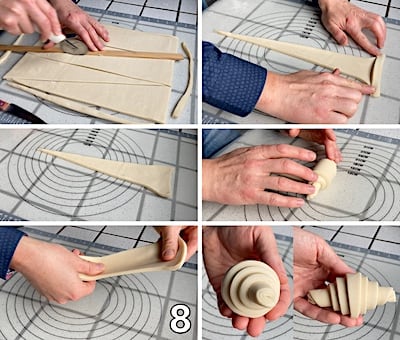
Work at room temperature between 18 and 22°. If it is too hot, place the ingredients in the refrigerator for a few hours. In a large bowl, knead with a hook mixer. Pour in flour, sugar, salt, crumbled yeast, the butter and mix for a few seconds. Finally, pour in the cold water and milk, liquid honey and egg whites if necessary, mix until the dough forms a coarse ball and leave to rest for 2 minutes so that the water can properly hydrate the flour. Knead for 3 to 4 minutes first at low speed and then at medium speed for 8 to 11 minutes (depending on the machine and hook). Check the glutinous network by stretching a piece of dough to form a translucent veil without marbling, tear-resistant which will trap water vapour and make the croissant puff up. As soon as the dough has a very smooth, firm and supple texture, can stretch twice its length without tearing, peeling away from the edge of the bowl without tearing (image 1B), stop kneading. Each flour requires a different method and time of kneading: too short or too long, it will give an unsuitable dough. Shape the dough into a very tight ball, wrap it in plastic film and leave to rest for 15 minutes, flatten and then chill for 20 minutes in the freezer (important, as the kneading has made it hot and you need to stop the activation of the yeast). Finally, give it the shape of a flat rectangle (important for the following), wrap it tightly and rest for 24 hours in a cool refrigerator (at 5°) for slow fermentation.
Lamination:
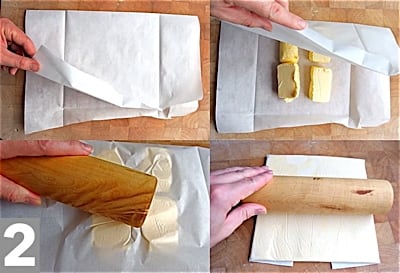
To shape the butter for lamination, take a 40 × 30 cm baking paper to be folded like an envelope or pocket with a folded size of 18 × 14 cm, and flatten the cold but slightly soft butter with the rolling pin. The folded edges prevent the butter from escaping when you tap it. Harden the flattened butter in the refrigerator a few hours in advance, still on its baking paper (image 2).
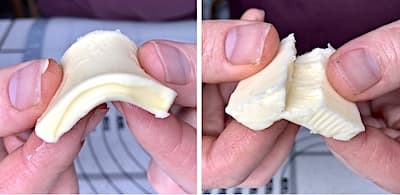
Remove the butter rack from the refrigerator 5 minutes beforehand. When folding, the butter should not be too soft, it should be flexible and supple around 12 to 15°, if it breaks under the dough, it is too cold.
Lamination and folding tire the dough. The resting time in the refrigerator after folding is essential to recover an ideal dough temperature of around 12° and to relax the strong tensions when the dough has been stretched. The dough is weakened by this stretching. It is necessary to work quickly to keep a cool temperature while practising this operation with as little handling as possible at the risk of tearing the surface of the dough with the roller, making the lamination butter penetrate into the dough and transforming it into a brioche dough, without puff pastry. If the room is too hot, place 4 to 6 cold accumulator briquets under a large metal plate covered with a silicone tablecloth on which the dough will be spread, so that the dough will always be cool when it comes into contact with the plate.
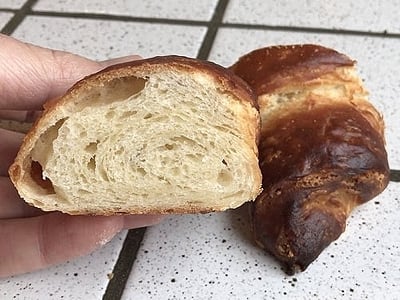


Lightly flour the worktop. Take the dough out of the refrigerator, form a dough rectangle of 30 L × 18 l cm. Place the soft butter at 15° in the middle of the rectangle and cover it with the dough (image 3). Be careful with the middle joint, the two edges must overlap by about 1 cm so that the dough spreads evenly. If the dough is very stiff, cut out the two folds of dough on each side with a knife to loosen the dough (picture 3) as if two separate rectangles of dough had been placed between the butter. And without waiting, to take advantage of the ideal temperature of the dough, make the first fold.
Double fold:
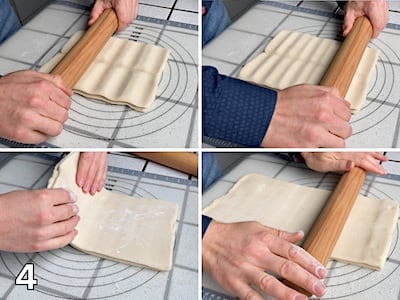
Lightly flour the worktop. Rotate the dough by a 1/4 turning (the central joint is oriented vertically). Make a rectangle of 60 L × 14 l cm and 6-7 mm thick (respecting the thickness is more important than the length). Always work the dough in the same direction. With the rolling pin (image 4), press down the lower and upper edges of the dough, do the same in the centre and then between the centre and the lower and upper halves, and make intermediate marks by pressing down on the bumps. Then, turn the dough over, with the bumps against the worktop, and within a few gestures, roll from the centre upwards, rotate the dough by 180° and roll from the centre upwards to smooth and lengthen. Always roll in this way, from the centre upwards. In this way, the dough stretches with very few gestures and remains rectangular. If the dough resists stretching, do not force it, allow it to rest for 5 to 10 minutes in the freezer and continue to shape it. Locate half the length of the dough strip. Remove excess flour with a brush and lightly moisten the surface of the dough.
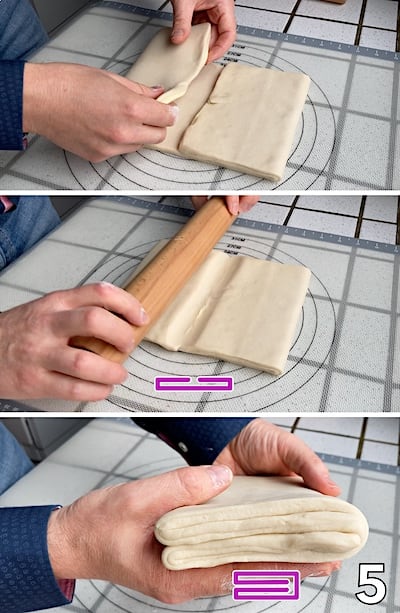
Fold the upper and lower 1/4 dough strips to meet in the middle, weld the joint with the roller, pressing it down a little, moisten half of the dough surface very slightly and fold it in half again (image 5), so that you end up with a square of approx. 14 cm in size.
Wrap the dough and allow it to rest for 15 minutes in the freezer or 1/2 to 1 hour in the refrigerator to relax it as it has been stretched very much, and cool it down ideally around 12 to 15°, but not lower. Otherwise the butter will be hard, less plastic, it will break and give a brioche croissant. At the same time, folding and laminating heats up the dough, activating the yeast which will swell the dough. Therefore, you need time to relax in the cold to loosen the dough, bring it to the right temperature and avoid the beginning of fermentation.
Simple fold:
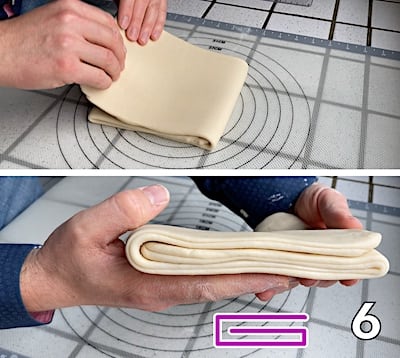
Lightly flour the worktop. Rotate the dough by a 1/4 turn (fold to the left and opening to the right) and make a rectangle of 60 L × 14 l cm and 6 mm thick again with the same technique of rolling out the dough with a roller (image 4). Always work the dough in the same direction. If the dough resists stretching to the right size, do not overwork it, let it rest for 5 to 10 minutes in the freezer and continue to shape it. With a brush, wet the surface of the dough very lightly and fold it in three, 1/3 over 1/3 over 1/3 (image 6) to finally obtain a square of about 14 cm on each side.
Wrap the dough and allow it to rest for 15 minutes in the freezer or 1/2 to 1 hour in the refrigerator to relax the dough which has been stretched out very much and cool it ideally to 12 to 15°, without starting fermentation.
Slicing and shaping of croissants:
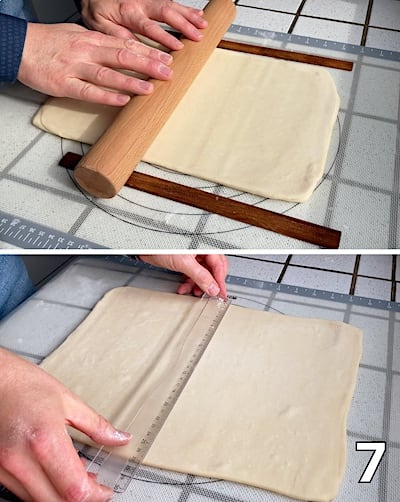
A chilled dough is essential for all the next steps. Several methods exist (dimensions, thicknesses, cuts, stretching) that will influence the final appearance. Lightly flour the worktop. Form a rectangle exactly of 32 L × 26 l cm and 4 mm thick, use wooden wedges of this thickness and place the rolling pin on it (image 7).
If, at this final stage, the dough is elastic (shrinks) instead of plastic (keeps its shape) either the kneading time of the dough has been wrong or the resting times after kneading have been too short. Do not hesitate to store it for 5 to 10 minutes in the freezer and continue to give it its shape. With a very sharp knife, cut the edges of the rectangle to even out the shape and unveil the layers to get a rectangle of 30 L × 24 l cm. Slice triangles of 8 cm in base and 30 cm long to make 6 croissants (image 8). Lay the triangles on a plate and leave them to rest in the refrigerator for several minutes to chill them ideally to around 12 to 15°. To shape the croissant, shape the right-angled triangle into an isosceles triangle, then take the base of the triangle with your left hand, and, with the thumb of your right hand, press gently and slide from the base to the centre of the triangle to make it a few centimetres longer, without ever touching the edges. Place the dough on the worktop, with the tip facing you and the base of the triangle in front. Take the two tips of the base of the triangle, make a first turn so that the tips meet the edges of the triangle (image 8). Wrap up, touching only the “ears” (the ends). Never manipulate the central area, as this may cause the layers to seal together as they must unfold. The tip of the triangle is underneath, on the bottom so that the croissant does not unroll when baking.
For 7 chocolate rolls (or chocolatines) or 14 minis: slice the rectangle of dough as for the croissants. Cut the dough into strips of 8 × 20 cm (or 8 × 10 cm for the minis), place a line of chocolate of 7 × 0,5 cm at 1/2 cm from the edge, roll up one turn, place a second line of chocolate, roll. Moisten the final edge with water to stick it to the dough, this edge will form the underside, the bottom of the pastry.
You can freeze the croissants now, first on a plate to keep their shape and then transfer to a freezer bag once hardened. They will keep for 3 weeks in the freezer. The older they get, the less they will leaven as freezing destroys some of the yeast and breaks down some of the plasticity of the dough.
Baking croissants:
Whichever method you choose, put them immediately on the baking tray and on baking paper, as they will never be able to be moved once they are soft and swollen. Space each of them at least 4 cm apart (image 9). To serve them for breakfast, 2 methods:
1- keep them raw or defrost them in the refrigerator overnight then leaven them up early in the morning just before cooking. Leavening the croissants at 25 to 27° for about 2 to 2.5 hours and always below 27°, otherwise the butter will melt and leak. To do this, put the baking tray filled with raw croissants in the cold oven, fill a bowl with boiling water, place the bowl in the oven and close its door. Boil the water again after one hour. They should at least double in volume. (best solution for beautiful croissants)
2- freeze them at least for 1/2 a day, take them out in the evening around midnight, leave them overnight to defrost, they will leaven and be ready to bake in the morning (image 9), either at room temperature (20 to 22°) for 6 to 9 hours maximum or in a cellar (14 to 16°) for 8 to 11 hours maximum. They should at least double in volume. Protect them from drying out by covering the baking tray with aluminium foil, plastic wrap (to be coated with a thin layer of oil so that the plastic wrap does not stick to the dough), a damp cloth or under a lid so that they do not dry out when they rise. (the easiest solution)
The leavening step must be mastered, it is at this stage that will give the final shape to the croissant. Indeed, they will have reached their final size because they will not rise much more in the oven. Everything will depend on the elasticity of the dough. During this second rising or fermentation, if they rise too much, the dough will be perforated, carbon dioxide and water vapour will escape during baking and they will become flat. They must at least double in volume. Fresh yeast is quicker to activate than dry yeast, but non-activated dry yeast is more resistant to freezing (which kills the yeast).
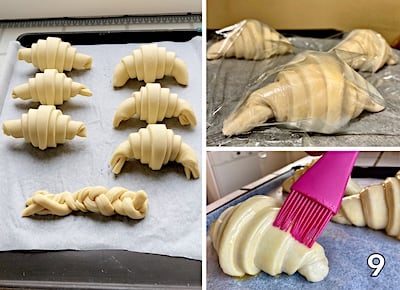
Before baking, with a brush, glaze the croissants once while the oven preheats (image 9). If glazed with eggs, glaze a second time after 15 minutes just before baking.
Place a bowl of boiling water on the bottom of the oven, the baking tray is on level 2 of the oven (at the 1/3 bottom of the oven). 2 cooking methods for a very different taste and appearance (1- nice and crispy, or 2- very tasty):
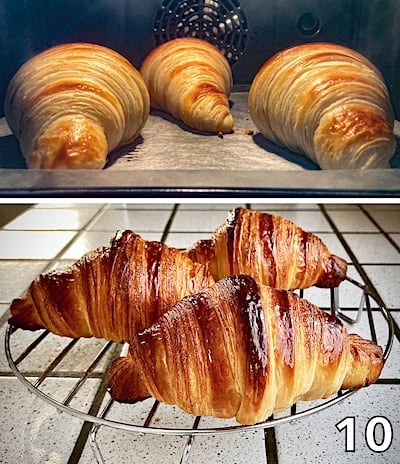
1- Oven preheated to 240° for 15 minutes, bake for 9 minutes at 240° in a convection oven (image 10, the crust gives a rigid external structure, the croissant will keep its puffy aspect, the bottom will be very crispy), then 4 to 5 minutes at 180°. Best if egg white is added to compensate for a low protein content or a fragile glutinous network.
2- Oven preheated to 170° in a fan-assisted oven, bake for 22 to 25 minutes. A slower cooking time will develop all the flavours of the croissant, but it will be less pretty and crispy. Best if the glutenous network is perfect.
Leave to cool on a wire rack for about an hour before serving (image 10).


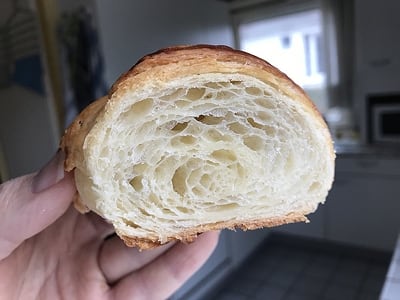
Proper baking is a matter of preference and requires several trials to adjust to the oven's behaviour. As soon as the melted butter no longer makes bubbles, the end of the cooking time is reached in the last 2 to 3 minutes. It can be browned and crisped for a few more minutes in the oven, but the inside will become drier. A crumb that is still slightly moist is richer in taste, retains more flavour and has a denser texture.
Like all pastries, they do not keep for more than 12 hours in the open air, otherwise dry them in the oven at 100° for 10 minutes.
“If-” you'll be a Man…
Re-discover Rudyard Kipling's famous poem “If- you'll be a Man, my son” which has inspired so many generations. It celebrates the courage to overcome hardship.
I've decided to succeed
I have put together 10 tried and tested tips for finding the will to successfully achieve your ambitions and overcome obstacles in your personal and professional life.
Gourmet treats
Exquisite recipes for mini-cakes (madeleines, financiers, biscuits, cakes, muffins) and other delicacies (croissants, brioche, traditional cakes…).